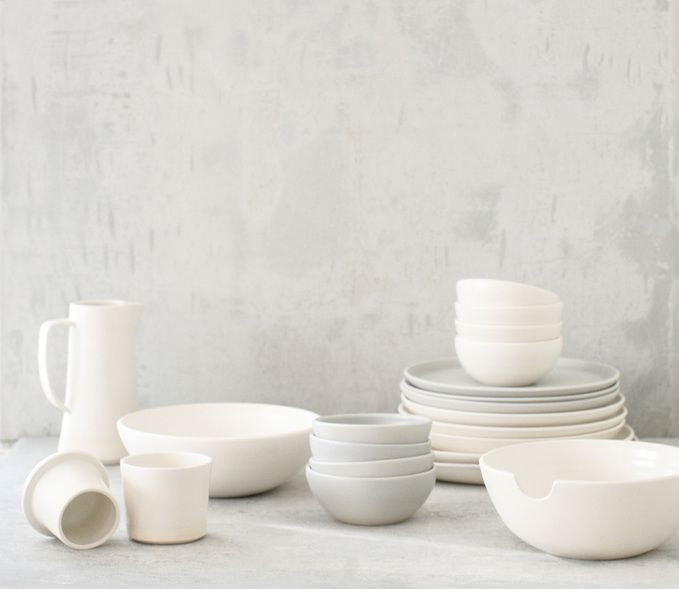
These concrete boards ended up looking so dreamy in Ashleigh Peak's photo shoot for Brit McDaniel's Paper & Clay website and catalogue. During the process of creating this look I learned a couple of other things about concrete. Read more to learn a few things about different mixes and their capabilities.
 picture 1 | 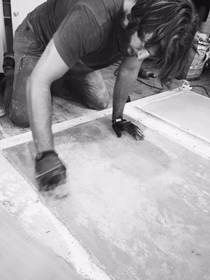 picture 2 | 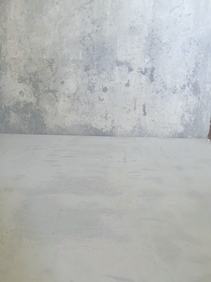 picture 3 |
This was a long process involving cement boards, rapid set, pigment, portland cement slurry coats and tons of sanding. It was a messy job, but the final product is durable and dreamy.
 Picture 4
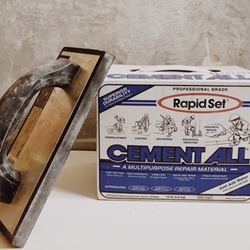
 Board preparation
Picture 1 shows the concrete boards after all the coatings were applied, but not sanded yet. We started out by splitting a cement board in half to make our two pieces. This doesn't take much just a couple of scorings with a utility knife and a knee to the scored area. Before adding our mixture we wet and wiped the boards clean of any debris.
Mixture preparation
Then we used a paint stir bit on our electric drill to quickly mix our rapid set concrete. In order to achieve a uniform color we added pure pigment from our local art store to the mixture.
Application process
With clean wet boards, we floated the aggregate free concrete mix onto the cement board using our molded rubber float (picture4). Unfortunately rapid set concrete requires you to spritz with water to set, so we checked on the dryness of the boards every 10 minutes for an hour to add water. Once the coating dried we sanded to smooth it out, and then repeated this process several more times til we thought it looked perfectly textured and dreamy. The final layer was applied as a slurry (portland cement, water and color) with the molded rubber float which we sanded to smooth.
Picture 2 shows the sanding process. We used a diamond sanding block from our Home Depot ( I think you can find these in the tile department). Even though in this picture we weren't wearing a mask, we did most of the time. The dust from cement can be caustic.
Picture 3 has the board from above on top and the second board that we did on bottom. The second board was just a slurry coat over the cement board. It took longer to dry, and it was not as durable of a finish. However, the result was quicker to achieve.
Artistic failed attempts with concrete
We wanted to include some information about what didn't work as well as what did work, because in our own research we felt like we couldn't find any information on this stuff.
1. Even though we used Quikrete fast setting mix which has a rapid curing time, it still took 3 days to dry enough to take out of a casting. We took out 50% of the aggregate trying to achieve a smoother finish and used melamine boards and a plastic sheet on the bottom. The plastic sheeting stuck to the concrete. Next time I will reattempt with a releasing agent (spray olive oil) and wait the full 3 days to cure.
2. We followed another companies ideas about dusting the surface with color then adding our pure pigment colored concrete to the surface and got dots of color. not what we were looking for
3. White portland cement is just portland cement with pure pigment titanium dioxide!
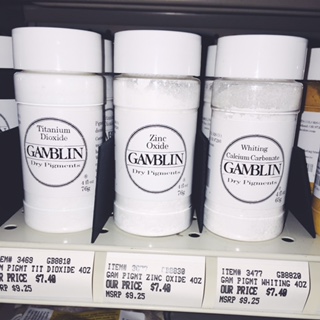
4. This is the pigment we used. Later I found this stuff available in pound size amounts for a lot less. Sorry little art store! Next time I may even buy from Buddy Rhodes website to see if there is a difference. stay tuned
Picture 1 shows the concrete boards after all the coatings were applied, but not sanded yet. We started out by splitting a cement board in half to make our two pieces. This doesn't take much just a couple of scorings with a utility knife and a knee to the scored area. Before adding our mixture we wet and wiped the boards clean of any debris.
Mixture preparation
Then we used a paint stir bit on our electric drill to quickly mix our rapid set concrete. In order to achieve a uniform color we added pure pigment from our local art store to the mixture.
Application process
With clean wet boards, we floated the aggregate free concrete mix onto the cement board using our molded rubber float (picture4). Unfortunately rapid set concrete requires you to spritz with water to set, so we checked on the dryness of the boards every 10 minutes for an hour to add water. Once the coating dried we sanded to smooth it out, and then repeated this process several more times til we thought it looked perfectly textured and dreamy. The final layer was applied as a slurry (portland cement, water and color) with the molded rubber float which we sanded to smooth.
Picture 2 shows the sanding process. We used a diamond sanding block from our Home Depot ( I think you can find these in the tile department). Even though in this picture we weren't wearing a mask, we did most of the time. The dust from cement can be caustic.
Picture 3 has the board from above on top and the second board that we did on bottom. The second board was just a slurry coat over the cement board. It took longer to dry, and it was not as durable of a finish. However, the result was quicker to achieve.
Artistic failed attempts with concrete
We wanted to include some information about what didn't work as well as what did work, because in our own research we felt like we couldn't find any information on this stuff.
1. Even though we used Quikrete fast setting mix which has a rapid curing time, it still took 3 days to dry enough to take out of a casting. We took out 50% of the aggregate trying to achieve a smoother finish and used melamine boards and a plastic sheet on the bottom. The plastic sheeting stuck to the concrete. Next time I will reattempt with a releasing agent (spray olive oil) and wait the full 3 days to cure.
2. We followed another companies ideas about dusting the surface with color then adding our pure pigment colored concrete to the surface and got dots of color. not what we were looking for
3. White portland cement is just portland cement with pure pigment titanium dioxide!
4. This is the pigment we used. Later I found this stuff available in pound size amounts for a lot less. Sorry little art store! Next time I may even buy from Buddy Rhodes website to see if there is a difference. stay tuned

 RSS Feed
